
Making a Ghillie suit or pullover can be fun but be prepared, It is a lot of work. There are 2 different types that I have made. One is a full pullover with arms and hood. The second one I made that I will show you in this example is a sleeveless pullover. Later i will show you how to make the hat.
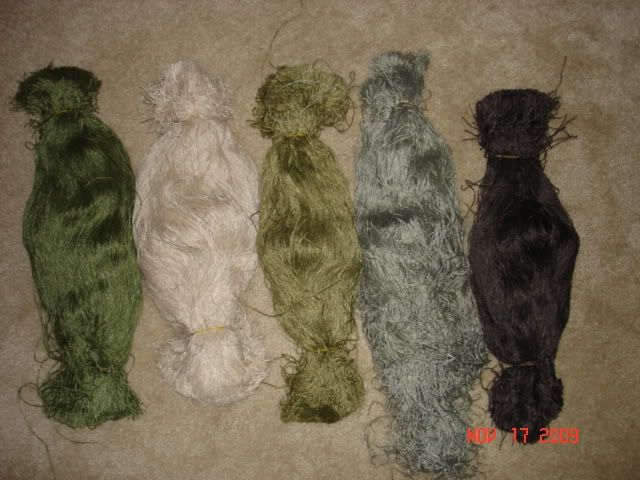
The ghillie sleeveless pullover is something you can roll up and put in your pack and put on once you get to your location. Colors will depend on the area you are hunting in. In my example I have done more of a woodland camo using the following synthetic jute thread.
![Image]()
The first thing you will need is 5X9 netting and 5 or 6 bundles of synthetic jute thread in different colors that you can get from Ghilliesuits.com Use synthetic as it will not rot and can be washed or you can get the KIT You will have enough left over for your boonie hat, rifle wraps, backpack ghillie etc.
IMPORTANT NOTE
TAKE YOUR TIME! As with anything, the more time you spend on it the better it will turn out! If you get board with it put it aside and work on it later. If you don't it may drive you batty!
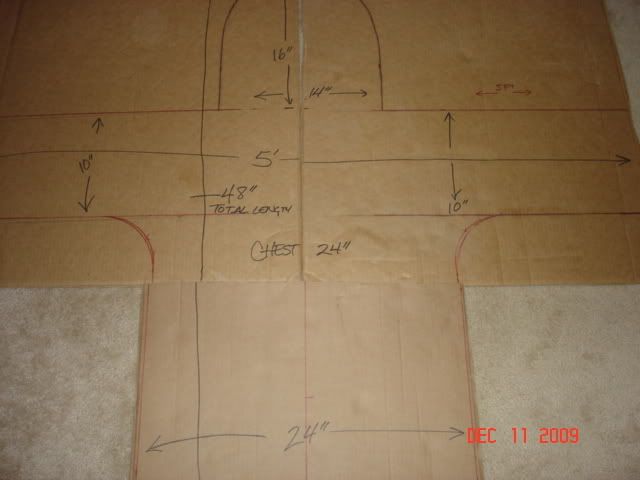
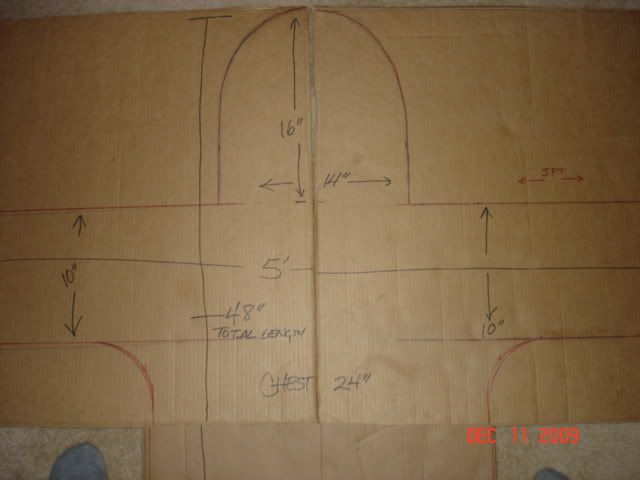
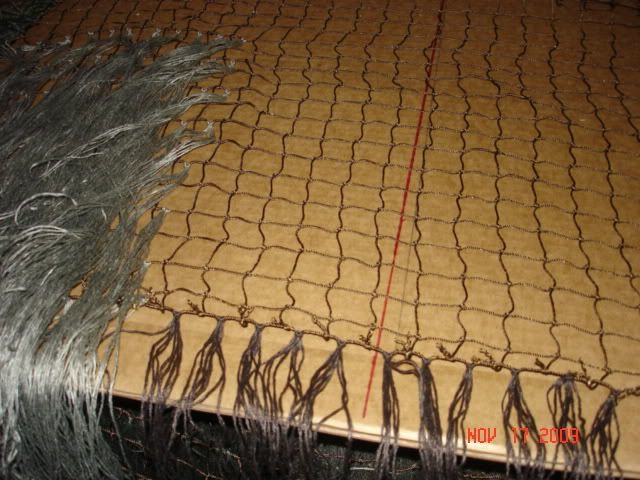
I don't want to confuse anyone but I made a template from cardboard for my full pullover. If you want to make a full pullover go by my template. I am 5' 11" with a medium build so you can adjust it from there.
The only thing I used from this to make the sleeveless ghillie is the measurement for the chest.
![Image]()
![Image]()
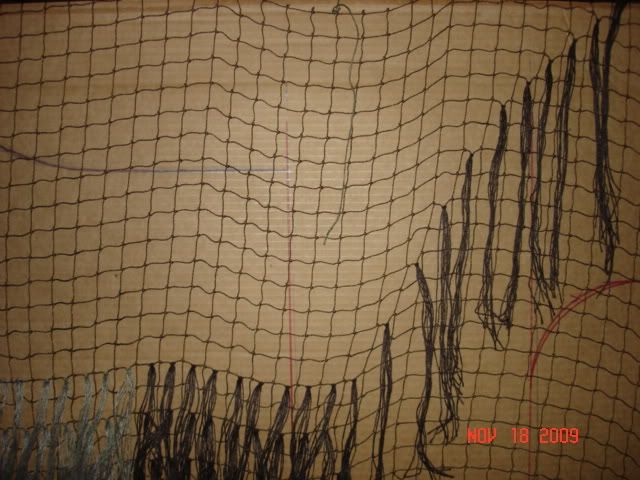
The first thing you want to do to start your sleeveless ghillie is to take and measure from your neck to a little below the waist. Now take the 5X9 netting and lay it flat. Measure from the bottom to were the neck is going to be then count the 1" squares to where it is going to come to your shoulders and neck. Once you find the center for your shoulders/neck tie in a couple strands of thread along each side. Now count the same number of squares going down the back from the center of neck/shoulders and mark your length for the back. You can make it a little longer or the same length if you like. I made mine the exact same length front/back. Once you have the length figured out make your cut from the back.
Now measure your width for the chest/back, around 24" to 26" depending on your chest size. Count the 1" squares and tie in a couple of strands to mark the width at top and bottom and make your cut. Now fold the netting in half use your thread that you tied in for your neck/shoulders as a guide. I actually recounted the squares to make sure it was even.
Once you have made sure it is even drape it over a wide piece of cardboard, make sure it is longer than the netting. I didn't do this and it would have been a lot easier.
At this point you want to take no more than 5 strands of jute thread and start tying in the sides. Start at the very bottom corner, match up the 2 corners and tie them together in a knot. Skip a square and repeat. Do about 6 knots then go to the top and count down 10 squares. After the 10th square (front and back) tie in some thread. This will be the opening for your arm. Continue working your way down. Repeat on the other side.
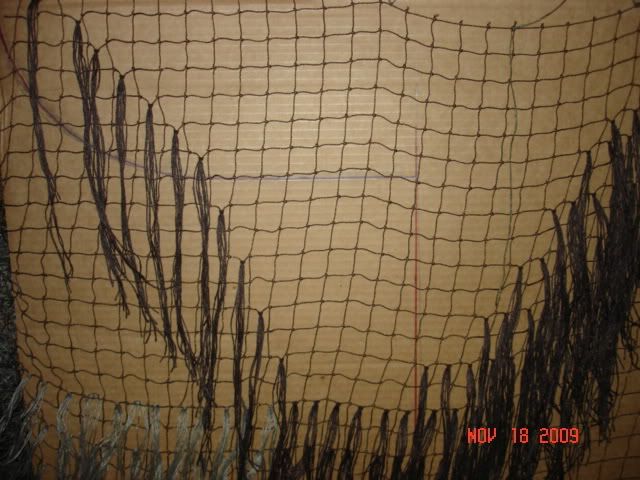
Now for the hole for your head. Let's assume that the netting is 24 squares wide for your chest/back. This means you will count over 12 squares from each side at the top from were you marked your shoulders. This is the center for your head. Tie in a strand of thread to mark center. Now from center count 3 over to the left and right, mark these with thread. Once marked you can cut the netting. Now try it on. if the hole for your head is to small cut a square on one side then a square on the other. You do not want it to big. You should have something that looks like this.
![Image]()
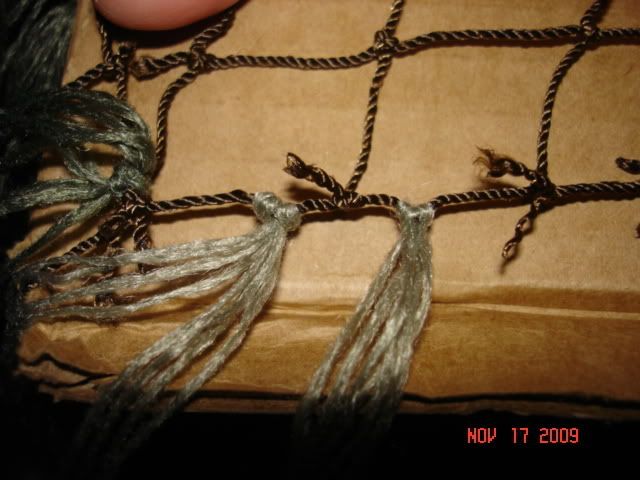
Lets start tying in thread. You only want to use 4 strands per square or you will be to bushy!
![Image]()
First thing to remember is that you WANT big patches of color. Start at the bottom left corner, choose a color and pull 4 strands and attach as pictured. Be sure to pull tight!
![Image]()
Working along bottom edge
![Image]()
This is the width of this patch of color. Time to work my way up.
![Image]()
Now SKIP a square above the row you just did and do the same thing.
![Image]()
Second row done. Remember to SKIP a square when you start your next row. Not only does this keep you from being to bushy but leaves room for natural vegetation to be applied.
![Image]()
This is where I decided to stop and move to my next color. I probably did around 12 squares along the bottom and 10 or 12 towards the top.
![Image]()
Since i used gray I want to use a darker color next to it so starting at the very bottom I start with my next color (brown) right beside my last knot of gray.
![Image]()
I continue to work along the bottom edge all the way across.
![Image]()
As before, I skip a square working my way up.
![Image]()
![Image]()
I decided I wanted a patten in my ghillie representing a limb? Just remember to skip a square as you go up. Then just fill in the void....remember to skip a square!
![Image]()
Filling it in. Always remembering to skip a square as I go up. :wink:
![Image]()
Here I marked out my pattern going up the other side.
![Image]()
Filled in to desired width of "branch" remember: BIG patches of color!
![Image]()
Now to fill in between the gray (where we started) and the branch. I used a mid tone color for this area (bright green) REMEMBER to skip a square as you go up!
![Image]()
Area filled.
![Image]()
Now I changed colors and used olive for the area above the "branch" and went to about the center of the neck remembering to skip a square as I go up.
![Image]()
Now i filled in the area above the right branch with gray. Skip that square as you work up.
![Image]()
I filled in the area below the right "branch" with dark green. I know your tired of hearing it but REMEMBER to skip a square as you work up or down!
![Image]()
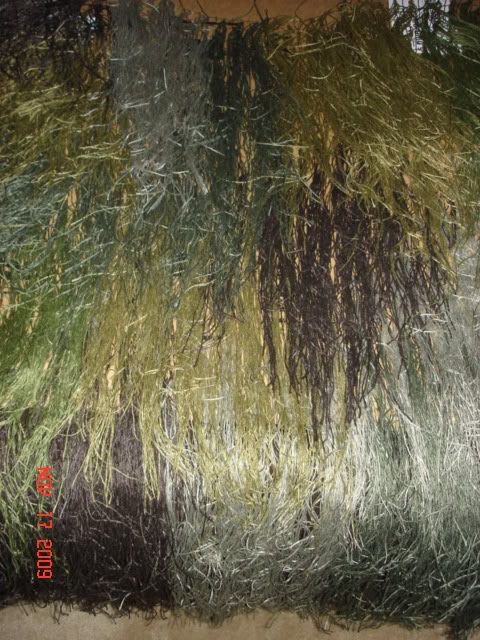
Front complete.
![Image]()
Back
![Image]()
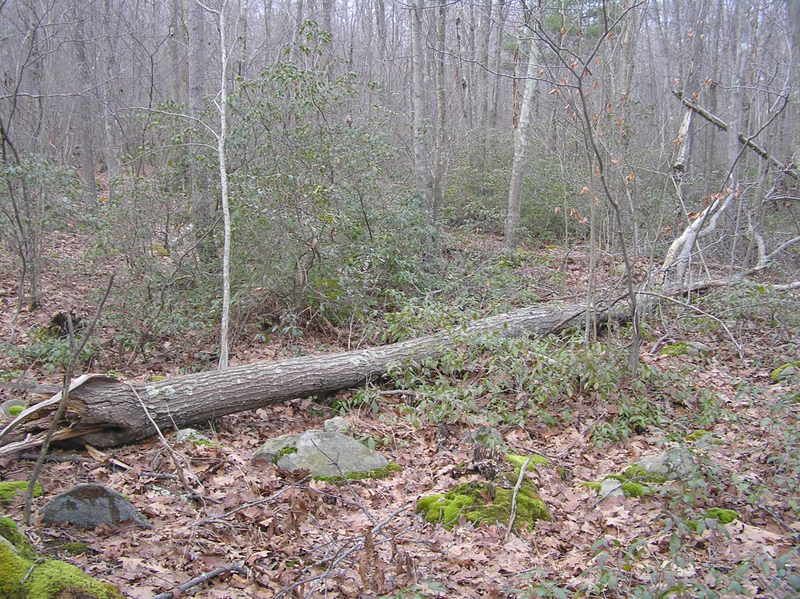
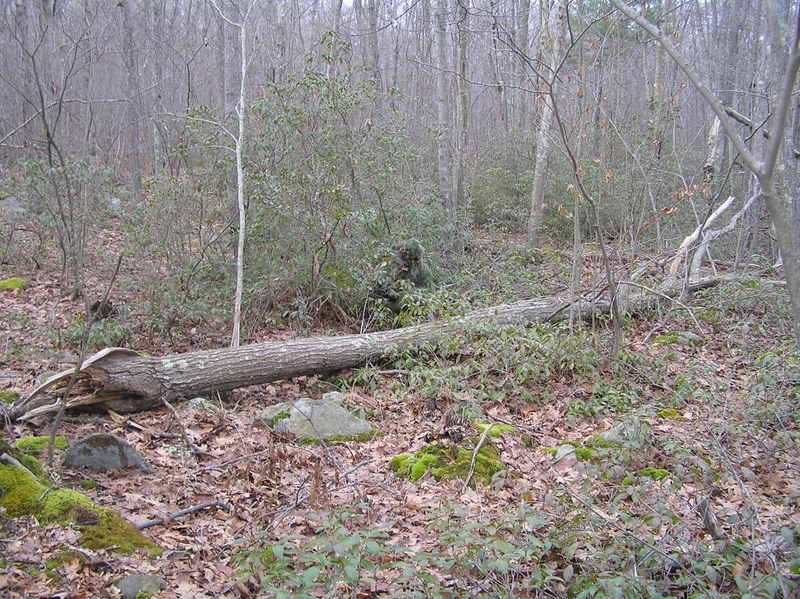
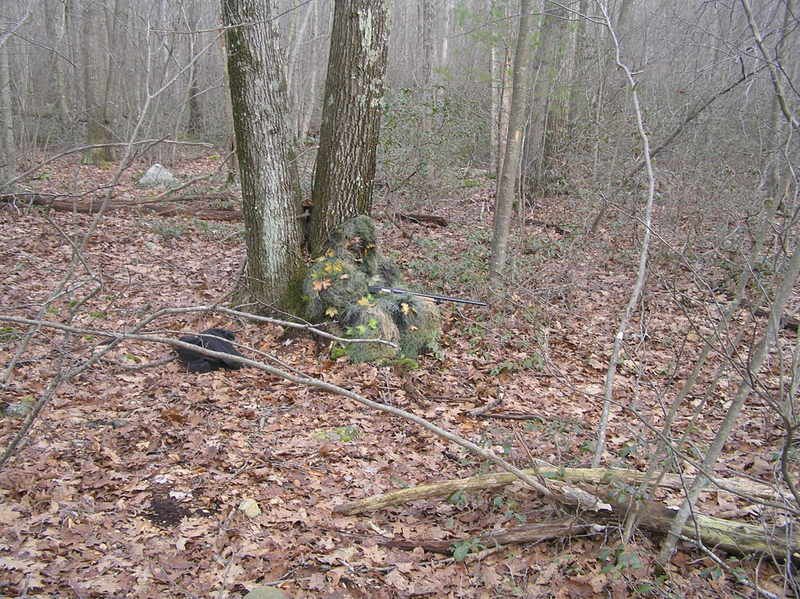
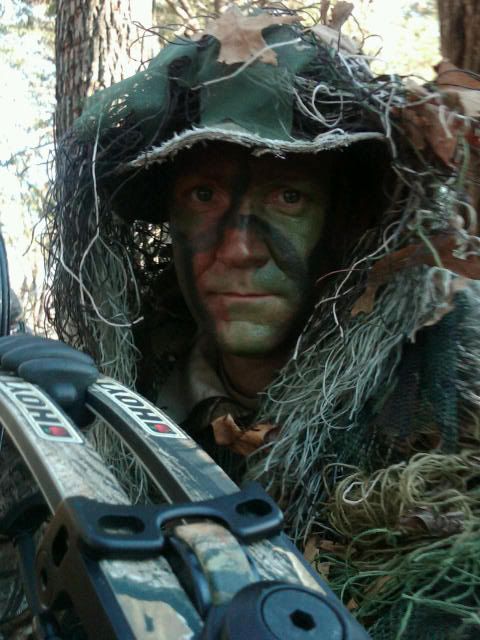
Me in the woods with the sleeveless and boonie hat ghillie.
![Image]()
In my next post we will add accent strands and 3D leafs that we will make from mosquito netting.
The ghillie sleeveless pullover is something you can roll up and put in your pack and put on once you get to your location. Colors will depend on the area you are hunting in. In my example I have done more of a woodland camo using the following synthetic jute thread.
The first thing you will need is 5X9 netting and 5 or 6 bundles of synthetic jute thread in different colors that you can get from Ghilliesuits.com Use synthetic as it will not rot and can be washed or you can get the KIT You will have enough left over for your boonie hat, rifle wraps, backpack ghillie etc.
IMPORTANT NOTE
TAKE YOUR TIME! As with anything, the more time you spend on it the better it will turn out! If you get board with it put it aside and work on it later. If you don't it may drive you batty!
I don't want to confuse anyone but I made a template from cardboard for my full pullover. If you want to make a full pullover go by my template. I am 5' 11" with a medium build so you can adjust it from there.
The only thing I used from this to make the sleeveless ghillie is the measurement for the chest.
The first thing you want to do to start your sleeveless ghillie is to take and measure from your neck to a little below the waist. Now take the 5X9 netting and lay it flat. Measure from the bottom to were the neck is going to be then count the 1" squares to where it is going to come to your shoulders and neck. Once you find the center for your shoulders/neck tie in a couple strands of thread along each side. Now count the same number of squares going down the back from the center of neck/shoulders and mark your length for the back. You can make it a little longer or the same length if you like. I made mine the exact same length front/back. Once you have the length figured out make your cut from the back.
Now measure your width for the chest/back, around 24" to 26" depending on your chest size. Count the 1" squares and tie in a couple of strands to mark the width at top and bottom and make your cut. Now fold the netting in half use your thread that you tied in for your neck/shoulders as a guide. I actually recounted the squares to make sure it was even.
Once you have made sure it is even drape it over a wide piece of cardboard, make sure it is longer than the netting. I didn't do this and it would have been a lot easier.
At this point you want to take no more than 5 strands of jute thread and start tying in the sides. Start at the very bottom corner, match up the 2 corners and tie them together in a knot. Skip a square and repeat. Do about 6 knots then go to the top and count down 10 squares. After the 10th square (front and back) tie in some thread. This will be the opening for your arm. Continue working your way down. Repeat on the other side.
Now for the hole for your head. Let's assume that the netting is 24 squares wide for your chest/back. This means you will count over 12 squares from each side at the top from were you marked your shoulders. This is the center for your head. Tie in a strand of thread to mark center. Now from center count 3 over to the left and right, mark these with thread. Once marked you can cut the netting. Now try it on. if the hole for your head is to small cut a square on one side then a square on the other. You do not want it to big. You should have something that looks like this.

Lets start tying in thread. You only want to use 4 strands per square or you will be to bushy!

First thing to remember is that you WANT big patches of color. Start at the bottom left corner, choose a color and pull 4 strands and attach as pictured. Be sure to pull tight!

Working along bottom edge
This is the width of this patch of color. Time to work my way up.

Now SKIP a square above the row you just did and do the same thing.

Second row done. Remember to SKIP a square when you start your next row. Not only does this keep you from being to bushy but leaves room for natural vegetation to be applied.

This is where I decided to stop and move to my next color. I probably did around 12 squares along the bottom and 10 or 12 towards the top.

Since i used gray I want to use a darker color next to it so starting at the very bottom I start with my next color (brown) right beside my last knot of gray.

I continue to work along the bottom edge all the way across.
As before, I skip a square working my way up.


I decided I wanted a patten in my ghillie representing a limb? Just remember to skip a square as you go up. Then just fill in the void....remember to skip a square!
Filling it in. Always remembering to skip a square as I go up. :wink:

Here I marked out my pattern going up the other side.
Filled in to desired width of "branch" remember: BIG patches of color!

Now to fill in between the gray (where we started) and the branch. I used a mid tone color for this area (bright green) REMEMBER to skip a square as you go up!

Area filled.

Now I changed colors and used olive for the area above the "branch" and went to about the center of the neck remembering to skip a square as I go up.

Now i filled in the area above the right branch with gray. Skip that square as you work up.

I filled in the area below the right "branch" with dark green. I know your tired of hearing it but REMEMBER to skip a square as you work up or down!

Front complete.

Back
Me in the woods with the sleeveless and boonie hat ghillie.
In my next post we will add accent strands and 3D leafs that we will make from mosquito netting.