Here's some more info:
The Basics of String Serving
By Larry Wise
The most common repair customers bring to me is the center serving. Most are broken or loose and need some routine maintenance. At least it should be routine. If you haven’t learned to install and repair servings or if you aren’t doing a good enough job of it then the following procedure will be of help to you.
Many of those same customers also want a peep installed. I’ll include a long-proven method for keeping the peep in place with the serving info so you can do complete string repair with the knowledge that what you’ve done will take some abuse and stay intact for the people who shop at your store.
The Center Serving
The center of the bowstring should be served with either monofilament or Polygrip braided serving thread. I use monofilament in size #18 or #20. A 12 strand DynaFlight string with #18 mono serving will fit the ACC .088” nock well. #20 mono is thicker and will fit nocks with wider throat sizes as will strings of more strands.
Another combination I can give you as a rule of thumb applies to the bigger Uni Nocks on aluminum arrows. Indoors I shoot the 2413 XX75 shaft with the Super Nock system. They fit well on a 14 strand 450 Premium (from BCY Fibers) string with #18 monofilament for center serving.
My first recommendation is to install any new string on the bow before doing the center serving. If your repairing an old one then leave it on the bow and fasten the bow in a press or some type of holding device so you can remove the old damaged serving from the string. If the serving is broken you should be able to unwind it. If you do need to cut it, be extremely careful not to cut the string strands themselves.
When you install the new serving, I recommend placing at least 3 inches of serving above the nocking point. This will prevent the serving from slipping up the string under the pressure of your customer’s fingers or release aid. Eight or nine inches of center serving should be sufficient to protect the string where it may rub your arm or cable guard. If your customer has lots of frayed string below the nocking point then use more than 9 inches. (You may have to remove the cable guard to do this.)
Repair
You may want to start serving near the cable guard and serve up to the string until you get three inches above the nocking point. This method doesn’t require removing the cable guard unless you want to serve lower than that.
In any case, the following steps for serving a string can be followed. You will have to practice them several times, especially the “finish” steps.
Steps To Follow
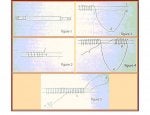
Begin the serving process by separating the strings from the cables. I use two 4-inch pieces of arrow shaft with nocks on both ends as shown in figure 1.
Next place the end of the serving thread between the strands of the bow string about 3 inches above the nocking point allowing a loose end to lay downward along the string (end A in figure 2). Serve down the string and over top of that loose end for about ¼ inch before pulling the end until it is snug. Continue serving until you have 1 to 1 ½ inches of serving over the loose end. Now pull the loose end out of the way (it can be cut off later) and continue serving down the string the desired distance. The finish of the serving can be done using only the serving tool if you follow these steps.
See Pictures below
a. Keeping tension on the serving, pull out about 12 inches of serving to form loop A in figure 3.
b. Hold it at the middle and loop the serving back to the bowstring several inches away from where you last served (point B in figure 3).
c. Continue serving with the tool inside the loop you just made but back toward the original section of serving. Wrap in the same direction around the string as before creating one-half inch or more of auxiliary serving B in figure 4.
d. Now lay several inches of serving thread C along the original portion of the serving as shown in figure 4.
e. Continue wrapping the original portion of serving by hand keeping even tension at all times. As you continue to increase the length of original serving you will wrap over thread C in figure 4.
f. As the original serving, D in figure 5 increases in length, the auxiliary serving will unwrap until all that remains is the 12 inch loop A in figure 5.
g. Now pull the serving tool from point C, figure 5, until the 12 inch loop is pulled through and under the last one-half inch of original serving. Snug and cut off the serving thread to finish.


