Archery Talk Forum banner

Lets build a Slimline inline together.

636K views 2.4K replies 584 participants last post by  Gene1  
#1 ·
Now we're talkin'...

:thumbs_up

Joe
 
#9 ·
The trick would be fastening the nut for the rod and securing the end cap. I'm sure it could be done in this fashion clamping things together with U bolts, and ordering bearing blocks secured with screws, and probably drill and tap the sides of a nut to secure it to the inside of the compression arm. You would need the nut, rod and bearing block in order to determine the size steel to fit your parts. I believe there's a build thread of someones that used parts in this manner for the screw mechanics. Nothings in stone here. This will help just seeing general perameters and a different take on things. You could even use All thread threaded rod if you like. I believe thats all LCA uses on their Golden presses. Actually you'd probably be surprized at what a case of beer will get you if you just go to a local weld shop or muffler shop and ask someone to help you weld it up on the side since you'll have all the parts layed out for him. You could do the grinding, drilling and sanding yourself. There's only about 8 parts or so to weld. Even a little $100 hobby welder would get you through it, and you'll have it around for a million other projects.
 
#11 ·
Getting started

First thing is to notice that the tubing has a weld seam going all the way down one side of the tubing. Try to keep that seam opposite your drilled holes if its going to interfere with your drill bit. Lets start by drilling out some of the holes before any welding. Here are the two 4 3/4" mounting brackets for the hangar assemblies using the 1 1/2" tube (no need to bother with these if you are going to build a conventional style press). The only thing to be concerned with is being sure that your seam is at top and or bottom of the parts and drilling your holes exactly on 1" centers. I use 4 holes for flexability, but you could use just 2 holes 2" apart. I also cut a 15 degree angle on the front edge just because, but again it not a must do thing; squared ends are fine. Just try to center up your holes on the parts and drill on 1" centers. (I stress exactly 1" centers because its important if using these hangar assemblies).
 

Attachments

#12 ·
Frame legs

Now to drill the 5/16" holes in the frame legs (1 1/2" x 8" tubes) where we will be welding on 5/16" nuts later to accept our adjustment levers. These holes are drilled through only 1 side of the part; so the seam isn't that big o'deal as long as it's not dead center of where you are drilling. For the sake of consistancy; I drilled mine on the seam side since the seam is off centered. We are drilling the hole 3" up from the bottom of the leg and in the center (3/4") on both pieces.
 

Attachments

#14 ·
Drilling sliding tail piece

Now we can drill the sliding tail piece for adjusting levers. With this piece as well as the main tube; We want to be sure that the seam is on the top of the part (important later). The tail piece is the 1 1/2" x 10" tube. We will be drilling these holes all the way through both sides of the part; so we'll have 3 holes on each side. Drill a 5/16" hole 1 1/2" in from each end and 1 hole in the center.
 

Attachments

#677 ·
Now we can drill the sliding tail piece for adjusting levers. With this piece as well as the main tube; We want to be sure that the seam is on the top of the part (important later). The tail piece is the 1 1/2" x 10" tube. We will be drilling these holes all the way through both sides of the part; so we'll have 3 holes on each side. Drill a 5/16" hole 1 1/2" in from each end and 1 hole in the center.
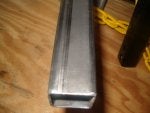
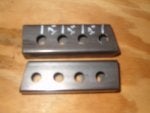
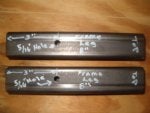
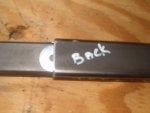
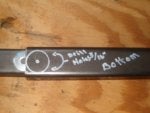
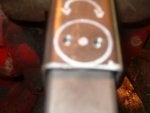
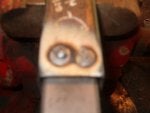
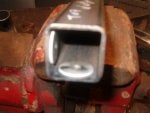
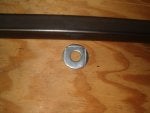
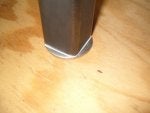
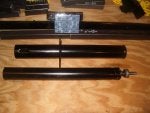
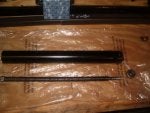
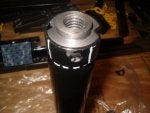
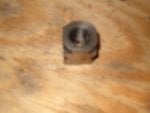
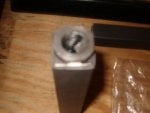
I have general question...when you drill both sides, do you drill all the way through from the same side or flip it? It seems like that would be difficulty for them to line up if drilling from both sides, but if you go all the way through from one side, does the bit wonder off a little? Sorry, new to metal working... lots of wood working and a good drill press to use, though. Thank you
 
#16 ·
Shimming main frame tube

Next we can take the 1 1/2" x 30" main frame tube and drill some holes in one end for spot welding the shims in place (1" x 3/16" fender washers). First thing be sure the seam is on the top of the frame. It will help to mark this side as the "top" as with the tail piece so we don't get confused later when we start welding parts together. By keeping the seam on top of the frame and tail piece; it will ensure that we have two flat surfaces to weld our shims to. These shims will eliminate any play between the sliding compression arm and the frame. These fender washers are just about a perfect fit without being too tight. Before we start with the shims lets be sure that they'll work and fit properly by sliding the 42" x 1 1/4" compression arm inside the main frame and dry fitting the shims in place. We are going to be putting our shims on the bottom and backside of the frame (inside of coarse). If the shims slide in place easily without bindinding; we can take them out and mark their location on the outside of the frame so we can mark the holes to drill.
 

Attachments

#17 ·
Spot welding shims

Now we can go ahead and spot weld the shims in place. Slide the 42" compression arm inside the frame tube and slide your shims in place making sure the line up good. Now apply some pressure against the shim we are going to weld by pushing against it with the compression arm to be sure the shim is flat against the inside of the frame. Now we can spot weld it in place through the 3/16" holes we drilled. When thats done; roll it over and do the other shim the same way. When finished; the inner tube should slide freely but snuggly inside the main frame.
Now we can clean it up by grinding down the welds and give a quick sanding.
 

Attachments

#18 ·
thanks for the pm safari i appreciate the heads up this threads gonna help alot
 
#19 ·
I know this will sound cray but the cheap fluxcore welder from Harbor Freight actually isnt to bad.You need to throw away the wire that comes with it right away and replace with better quality.I used a friend of mines a couple weeks ago for a few small things he needed help with and I was pretty impressed.Im no welding expert by any means.I have beginner to low end intermediate skill with a mig.Ive welded quite a bit with a Lincoln 140 and yeah theres difference.For the hobby type user though I dont think the extra 450$ is worth it though.
 
#20 ·
Welding the Endcap

Sorry about crappy pics. The shim washers look thick in the photo, but actually quite thin. Thats why we use fender washers; they are about half as thick as a normal washer. These won't wear down like a plastic shim would. These shims not only tighten everything up; They also keep the frame and tail piece even on the compression tube. Now we can put the initial endcap on the frame. W use a heavy 3/4" washer for this because it's a large enough diameter to cover the tube opening, it's thick, and it will make it easy to center up the ACME screw in the frame later. We put the endcap on the opposite end of the frame from where we put the shims. We'll try to center the washer best we can, but its not too critical if we're off a little. It's just the initial endcap. Once we have it welded on all 4 sides; We can grind things down and clean it up a little. We won't grind it all the way through the welds so we still have a bit of the bead there for strength.
 

Attachments

#22 ·
Thanks.
The next thing we'll do is tear the jack down to get our mechanical parts to finish up the main press tube assembly; then we'll have something to look at. At that point we can discuss some optional ways to utilize it rather than just welding on legs and calling it done. Once we have the straight tube and sliding tail together; we basically have a press. At that point we could tack on hangar mounts like mine for portability, or we could tack on 90 degree arms for a conventional style, we could make legs that just slide on over the tube assembly so they can be put on and removed whenever we wanted to try out something else like a sliding upright for a string tensioner, or support arm for crossbows, an eventual draw attachment, adding a caution bar or cradle, on, and on. All depends on how modular one wants their press to be. We could ickshnea the legs altogether and clamp it dow at that point if desired. I probably should've started the thread building the press tube assembly so others could stop there and modify it to their needs if they wanted to. Oh well; good hind sight..
 
#24 ·
I haven't used one recently, but I have several years ago. They would be fine for projects like this. There really is no heavy welding involved; just a few short beads here and there. The material is 14 guage so no problem there either. Once you have a welder of some sort you'll find all kind of projects to tinker with, and wire is much easier than stick. I'd say give it a try and have some fun with it.
 
#28 ·
Parting out the jack

OK; lets part out the Top wind "A" frame jack since it's the most intimidating part to do. It's not near as tricky as it might look. We'll start by opening up the jack. We get a foot, a handle, and jack assemby. Don't need the foot, and don't need the outer housing for the jack. We'll set aside the handle with the screw kept in it so it doesn't get lost. We can now slide off the outer housing and get it out of our way. Now we're looking at the center jack post, the ACME screw, thrust bearing, and washer. Slide off the bearing and washer together and put aside on a piece of plastic (greasey). Now we can unscrew the ACME screw and remove it through the bottom of the jack and set it aside on plastic as well.
 

Attachments

#29 ·
Removing the nut

OK; now we go for the nut; so to speak. Our ACME nut is kept in the jack post by a dimple pressed into each side of the jack. What we're going to do is cut out one of these dimples to release the nut so we can remove it with a pry bar or screw driver. The nut itself is round and about 1 1/2" deep.
 

Attachments

#30 ·
Round nut/square hole

OK; Now we have a nice round nut that we have to fit in a square hole. A little tricky, but we're gonna do it. Looking at the front of the nut; It has a raised center hub area that is just a hair larger than our square opening in our 1 1/4" compression arm tube. We are going to use a 4-4 1/2' grinder with a cutoff wheel and cut 4 flat sides off of this round nut using that raised center portion as our guide. We'll need to put the nut in a vise to do this and be sure to wear safety glasses. For visual aid we're going to mark out the square sides on the face of the nut with a marker just to use as a guide so we can make our nut as square as we can. If its not perfect; don't worry about it. The main thing is that we want it to be as close as possible to a proper fit without over cutting it making the walls of our nut much thinner than we need, because we are going to spot weld it through the holes we make in our tube just like we did with our shims. As we cut off each side using the center hub as our guide; We will then use a grinding wheel and clean up our cut so that we just flaten out the top of the center hub area. This will leave us with approximately 3/16"-1/4" walls around our hole in the nut. Once we have all 4 sides cut; use the grinder to flatten off the sharp corners. This will make it fit the tube better due to the corners on the inner tube are rounded. Now take some pliers to hold the nut (its hot) and test fit into the end of our 1 1/4" square tube. Grind where needed until it makes an acceptable fit. A little loose won't hurt. Once we have a descent fit we can put the nut back on our ACME screw and thread it on all the way to the end (screw gun helps speed this part up).
 

Attachments

#31 ·
screw

Now we drill some 3/16" holes in the end of our compression arm for spot welding the nut in place. We will drill 1 per side offset to the outer side of center because that is the thickest part of our nut. Once this is done; use a file to smooth out any burrs, and we'll be ready to set it up for welding in place.
 

Attachments

#32 ·
levers

Here we are going to go ahead and make some adjustment levers for the legs and tail piece using 5" x 5/16" bolts because we are going to use a couple of them in setting up the ACME screw for welding. We simply bend them to a desireable angle, put 2 nuts on them and snug down; the using our cutoff wheel we'll cut off the bolt heads, and cut off the threaded ends flush with the second nut. Thats all there is to it.
 

Attachments

#33 ·
Welding screw/arm

Now we can set up and weld the nut and screw to the compression arm. The screw and nut need to be set up straight before we weld them in place. To do this we take our outer frame piece and use it as a straight edge by leaving it overhang the compression arm tube about 15" and clamp the two together. Now is where we use the levers we just made to set up the screw by placeing one under the screw near the end, and placing another behind the screw also near the end. This works pretty good for setting proper spacing to ensure the screw is straight before welding in in place. You may have to toy around a little with the spacing to get things straight depending on how well the nut fits. The main concern is that its straight and not so much wether the spacing is even on all four sides. If its even on 2 sides; things will be fine. We just don't want it binding when extended. Once we have it set up to our likeing; We'll use something like a piece of angle, flashing, leather, etc. to protect the exposed threads from spatter and dirt.
 

Attachments