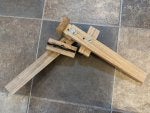

Made this a few days ago to deal with the occasional arrow going through a soft spot and sticking in the backstop as well as "forgot to move the sight when changing distance" arrows. Works well on pine, plywood, and plywood+10" of target bale. Previously I was using a rubber arrow puller, two hands, and my head braced against the target, or resorting to a drill or hammer which is much more likely to damage the arrow and wood.
It's similar to this one made for removing crossbow bolts from foam by Del the Cat. It's also somewhat similar to the tophat Takeout arrow puller but with a more area in contact with both the arrow and target which should reduce the force needed. On the downside, this version too large to keep assembled in a quive pocket.
It's not quite as quick to use as the Hamskea arojac, but one of those isn't in my budget. It cost me about $10 CAD as I didn't have any surplus wood or bolts lying around.
I currently don't have access to most of my workshop, so this was not made in the prettiest or most efficient way. But it does the job of getting arrows out of wood without damaging either and with much less effort.
Parts needed:
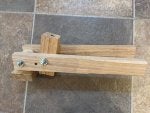
- wood for the handles, grips, and fulcrum. I used 1.5"X3/4" (19x38mm) wood that was available but narrower would be better, pieces are 30cm and 10cm long. Width and depth aren't very important, but it needs to be small enough to fit in one hand. Fulcrum was cut down from a piece of 2x3, 38mm wide.
These sizes work ok for my glove size 7 hands. For smaller hands you'd need thinner narrower wood.
Tools:
At the minimum, a hand saw and a drill. Measuring device useful but optional as it can be made well enough by eyeballing.
Directions:
To use, wiggle it around the shaft, press the fulcrum into the wood and pull the handle bit by bit while adjusting the arrow in the grips. This pulls the arrow straight out without bending. If the target material is soft, put something rigid line a short plank or a clipboard between the fulcrum and target to spread the load.
After pulling the arrow, be sure to check it's safe to keep using, see here if you're not sure what tests to do.
It's similar to this one made for removing crossbow bolts from foam by Del the Cat. It's also somewhat similar to the tophat Takeout arrow puller but with a more area in contact with both the arrow and target which should reduce the force needed. On the downside, this version too large to keep assembled in a quive pocket.
It's not quite as quick to use as the Hamskea arojac, but one of those isn't in my budget. It cost me about $10 CAD as I didn't have any surplus wood or bolts lying around.
I currently don't have access to most of my workshop, so this was not made in the prettiest or most efficient way. But it does the job of getting arrows out of wood without damaging either and with much less effort.
Parts needed:
- wood for the handles, grips, and fulcrum. I used 1.5"X3/4" (19x38mm) wood that was available but narrower would be better, pieces are 30cm and 10cm long. Width and depth aren't very important, but it needs to be small enough to fit in one hand. Fulcrum was cut down from a piece of 2x3, 38mm wide.
These sizes work ok for my glove size 7 hands. For smaller hands you'd need thinner narrower wood.
- a long bolt: twice the width of the handle+fulcrum width+a bit for the nut. Used a 3" 1/4-20.
- 2 short bolts: 2x handle width. M6x50mm.
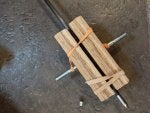
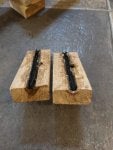
- rubbery stuff to grip the arrow. I used rubber tubing from an old printer but pieces of bicycle inner tube or stretch band tubing should do the same job.
- glue: I used 5 minute epoxy to smooth the arrow channel and seam sealer to attach the rubber tubing. The epoxy is only needed if you don't have a vice or clamps. Contact cement would likely do better than seam sealer.
Tools:
At the minimum, a hand saw and a drill. Measuring device useful but optional as it can be made well enough by eyeballing.
Directions:
- cut the wood to length. 30cm works well for the arm, good leverage without being too unwieldy. 10cm on the arrow grippers gives lots of contact area so you don't need as much force. Fulcrum needs to be at least half the length of the arrow grippers. I made mine too short which is why it's two pieces screwed together. I rounded one end of the fulcrum but that wasn't necessary in hindsight.
- drill holes for the bolts. They don't need to line up perfectly. On the arrow pads, drill a second hole halfway down that's big enough to accommodate the bolt head. The fulcrum hole should be as close to the end as you can get without splitting. The hole for the pads depends on the wood width, it needs to be just far enough away that the pads and fulcrum can rotate without hitting.
- clamp the arrow pads together with the holes lined up. Drill a hole down the length that's the same diameter as the arrow you want to pull + the thickness of the rubber you're using. If you don't have any clamps around, draw a line down the middle of each pad and drill lots of shallow holes and gouge away until you have two messy slots that are bigger than needed. Wrap an arrow in baking paper or cling wrap, stick the bolts through, line the slots with epoxy, and sandwich the arrow between the pads with some rubber bands until it cures.
- to glue the rubber to the pads, clean it and scratch the surface, then glue it up and press an arrow into the slot and keep it there until it sets.
- for final assembly, hand tighten the bolts. Having a bit of play in the fulcrum bolt makes it easier to get the pads around the stuck arrow shaft.
- if you want the same puller to grip a wide range of diameters then drill it for the largest diameter and wrap narrower shafts in a bit of bicycle inner tube.
- grip the end of the handle. If the edges are uncomfortable then sand or file them down.
To use, wiggle it around the shaft, press the fulcrum into the wood and pull the handle bit by bit while adjusting the arrow in the grips. This pulls the arrow straight out without bending. If the target material is soft, put something rigid line a short plank or a clipboard between the fulcrum and target to spread the load.
After pulling the arrow, be sure to check it's safe to keep using, see here if you're not sure what tests to do.