
So being a frugal (NOT!) kind of guy. Ok I'm a broadhead junky who just likes messing with broadheads of all shapes sizes and colors. The Stay Sharp sharpening guides peaked my interest both as a way to sharpen blades, and the price was very good. So I ordered both sharpening guides for fixed blades, and mechanical blades as well as the shaft squaring tool. Shipping was fast and they awaited me in my mailbox when I got home from work last night. With all the excitement of a kid with a new toy I snapped some pictures, grabbed the roughest head I have and commenced to test out the Stay Sharp sharpening tool for replaceable blades.
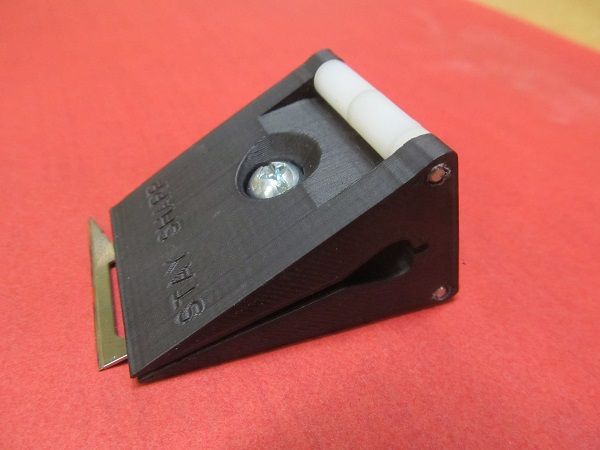
Simple packaging, made in the USA always a plus. Came with a 1 page printed instruction sheet. This is not a sharpening tutorial so I won't go through detailed steps. The tools for sharpening at my disposal were...
Ace Hardware sharpening stone $8 with a coarse and fine side. Pretty standard 8" knife sharpening stone.
Old leather belt to use as a strop
Sharpie marker for marking blade edges to use as a guide - I would say this is a key ingredient in getting things right.
Oil for the stone - it's called a whetstone but I've seen more than a few actually use water or dry. Not good for the stone. I use air tool oil comes in big bottles, is very thin, works well.
Screwdriver - flat or phillips head will work the Stay Sharp guide bolt is cut for either. Which is good because whenever I need one or the other I can only find the other.")
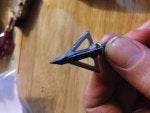
The blades chosen to take this brave bold leap into sharpening were in rough shape. Knicks, rolls, dull as a butter knife blades off a Slick Trick standard with a bent ferrule tip.
![]()
Please excuse dirty fingernails in the picture as stated I had just got home from work.
![]()
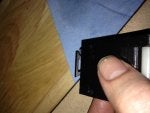
So I removed the blades picked the first victim and placed it in the guide per the directions, and hit the blade edge with a sharpie. NOTE this pic shows how to NOT put the blade in the tool it wasn't out far enough by about 1/8" so I had to adjust it. The first blade you do takes a few tweaks to get it set right. Once you figure the first out the rest are easy.
![]()
These blades were rough so I started with a well oiled coarse stone gave it some firm pressure and played hotwheels back and forth on the stone while flipping probably every 30 strokes but this as I said was a rough blade so I was really working it down. However I started with only 5 strokes to make sure the sharpie was being removed evenly across the blade length. If it isn't just loosen and adjust accordingly. The tool holds the blade well and doesn't need to be super tight so tightening, and loosening it isn't a hassle at all.
One I had all the sharpie gone from both sides of the blade I flipped the stone and continued on the fine side getting lighter and lighter pressure as I went and flipping it until I was just basically rolling it back and forth. At which point the blade was package new blade sharp. This is the sharpness I like personally it's not hair popping but it's about as sharp as you get a blade and have it hold an edge. Will remove some hair, wouldn't want to grab it wrong that's for sure. But hey I decided to go whole hog since I was testing it out.
![]()
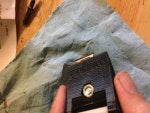
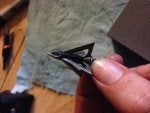
Here is the fresh blade note you can still see where there were some rolled edges. I could have done a little more work on the coarse side of the stone but it's still extremely sharp.
For the next step I got my leather belt layed it across the table held it with one hand, and rolled the stay sharp tool backwards along it about 20 times per side. The tool works great for this as it holds the belt flat as it rolls. At which point the blade was in fact shaving sharp. It was peel the skin off your arm sharp actually.
For a finish up not tool related I touched up the ferrule tip of this old ST standard on my stone to make it nice and sharp, and re-assembled the head.
![]()
It's now ready to go back on a shaft and kill again...muwahahahaha!
In summary for a $15 tool this one is a keeper as that is the cost of 1 set of replacement blades. It works very well and the only challenging part is getting the blade clamped in right but once you figure that out 1 time after that it's easy. Farting around included, and walking the dog in my post work haze it probably took me a total of 10 minutes to sharpen 1 set of really rough blades for a 4 bladed broadhead. Had it not been for some serious grinding on the coarse stone needed to clean up the blade initially I could probably now sharpen them again in 5 minutes or less.
I'm very please with the tool. It rolls easy, hold it's angle even under firm pressure. It is not flimsy at all and I suspect it will last for years of heavy use. I would definitely recommend it to someone looking to save money with a little elbow grease time in front of the TV. If you shoot 3 new heads, resharpen the blades 1 time it's paid for itself. That's pretty hard to beat. Especially since most replaceable head blades now are pretty thick you can get a lot of use out of 1 set of blades. Also sometimes blades aren't as sharp as you want out of the package and this solves that as well.
No real negatives other than it's not going to work with most mechanical blades. However it's fiddly getting it set but just to see it will work with my NAP Killzone blades, would likely work with Rage blades as well.
Next when I get the chance I'm going to try the fixed blade Stay Sharp on some Magnus Killer Bee's, and when I get some new shafts I will try out the shaft squaring tool as well.
Simple packaging, made in the USA always a plus. Came with a 1 page printed instruction sheet. This is not a sharpening tutorial so I won't go through detailed steps. The tools for sharpening at my disposal were...
Ace Hardware sharpening stone $8 with a coarse and fine side. Pretty standard 8" knife sharpening stone.
Old leather belt to use as a strop
Sharpie marker for marking blade edges to use as a guide - I would say this is a key ingredient in getting things right.
Oil for the stone - it's called a whetstone but I've seen more than a few actually use water or dry. Not good for the stone. I use air tool oil comes in big bottles, is very thin, works well.
Screwdriver - flat or phillips head will work the Stay Sharp guide bolt is cut for either. Which is good because whenever I need one or the other I can only find the other.
The blades chosen to take this brave bold leap into sharpening were in rough shape. Knicks, rolls, dull as a butter knife blades off a Slick Trick standard with a bent ferrule tip.
Please excuse dirty fingernails in the picture as stated I had just got home from work.
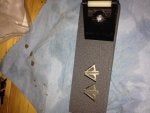
So I removed the blades picked the first victim and placed it in the guide per the directions, and hit the blade edge with a sharpie. NOTE this pic shows how to NOT put the blade in the tool it wasn't out far enough by about 1/8" so I had to adjust it. The first blade you do takes a few tweaks to get it set right. Once you figure the first out the rest are easy.
These blades were rough so I started with a well oiled coarse stone gave it some firm pressure and played hotwheels back and forth on the stone while flipping probably every 30 strokes but this as I said was a rough blade so I was really working it down. However I started with only 5 strokes to make sure the sharpie was being removed evenly across the blade length. If it isn't just loosen and adjust accordingly. The tool holds the blade well and doesn't need to be super tight so tightening, and loosening it isn't a hassle at all.
One I had all the sharpie gone from both sides of the blade I flipped the stone and continued on the fine side getting lighter and lighter pressure as I went and flipping it until I was just basically rolling it back and forth. At which point the blade was package new blade sharp. This is the sharpness I like personally it's not hair popping but it's about as sharp as you get a blade and have it hold an edge. Will remove some hair, wouldn't want to grab it wrong that's for sure. But hey I decided to go whole hog since I was testing it out.
Here is the fresh blade note you can still see where there were some rolled edges. I could have done a little more work on the coarse side of the stone but it's still extremely sharp.
For the next step I got my leather belt layed it across the table held it with one hand, and rolled the stay sharp tool backwards along it about 20 times per side. The tool works great for this as it holds the belt flat as it rolls. At which point the blade was in fact shaving sharp. It was peel the skin off your arm sharp actually.
For a finish up not tool related I touched up the ferrule tip of this old ST standard on my stone to make it nice and sharp, and re-assembled the head.
It's now ready to go back on a shaft and kill again...muwahahahaha!
In summary for a $15 tool this one is a keeper as that is the cost of 1 set of replacement blades. It works very well and the only challenging part is getting the blade clamped in right but once you figure that out 1 time after that it's easy. Farting around included, and walking the dog in my post work haze it probably took me a total of 10 minutes to sharpen 1 set of really rough blades for a 4 bladed broadhead. Had it not been for some serious grinding on the coarse stone needed to clean up the blade initially I could probably now sharpen them again in 5 minutes or less.
I'm very please with the tool. It rolls easy, hold it's angle even under firm pressure. It is not flimsy at all and I suspect it will last for years of heavy use. I would definitely recommend it to someone looking to save money with a little elbow grease time in front of the TV. If you shoot 3 new heads, resharpen the blades 1 time it's paid for itself. That's pretty hard to beat. Especially since most replaceable head blades now are pretty thick you can get a lot of use out of 1 set of blades. Also sometimes blades aren't as sharp as you want out of the package and this solves that as well.
No real negatives other than it's not going to work with most mechanical blades. However it's fiddly getting it set but just to see it will work with my NAP Killzone blades, would likely work with Rage blades as well.
Next when I get the chance I'm going to try the fixed blade Stay Sharp on some Magnus Killer Bee's, and when I get some new shafts I will try out the shaft squaring tool as well.